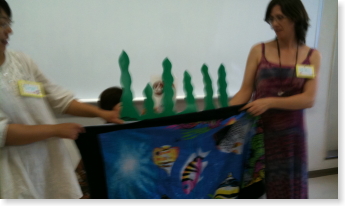
The Under the Sea theme is becoming a bit of a Summer tradition. I popped along to the Fukuoka ACET teachers meeting yesterday where they had a ton of great ideas…
Make some fake seaweed. Quickly flash picture cards behind the the seaweed and ask the kids what they can see! Use Google images to add in new sea animals.
What can you see under the tree?
Change the title of the song to tree and use it to teach bugs! (Or maybe even presents at Christmas time!)
Seafood Pizza
Take last week’s Crazy Pizza game and do it with seafood and bugs!
Kuru Kuru Ehon
Or how about this for an amazing way to introduce the vocab…
Here are the instructions. They are in Japanese but hopefully the pictures will let help out.
More ideas coming tomorrow, including one of the best picture books I’ve seen in ages!
P.S. I’ve just added another full day 9,000 yen workshop in Nagoya on August 2nd. Be sure to come along, details are here.

Wow!!!
Nigel I just love this idea. How great.
My kids all love this topic,and I just prepared a bunch of lessons on that topic for all ages, but I’ll go for the cube.
Have good cup of milk!
Thanks for sharing
Sorry,
looking at the video 10 more times after reading the instructions, i must admit, that I don’t completely understand.
I can see how the animals get together. You introduce 4 with this cube, and the milk cartoon has 4 sides.
But where does the “What can you see”
“Under the sea”
come from? And where does it go to, cause the second round starts immediately with the crab again?
So cool!!
I must say I had a look at the instructions, but I am a bit confused too. Is anyone willing to type the instructions in English over on the forum??
Pretty Please!!
okay, I got it!
I made one without pictures and with a rest of paper,very rough but I do KNow how it works now.
I’ll be off to the 100 Yen store and once I get it done I can explain things in English.
Might be that somebody is quicker than me, in that case, please go ahead!
(By the way, once I figured out how this worked, I was even more impressed. My neighbor helped me and I couldn’t believe that she understood the hole thing watching the video once. Japanese must be technical genius !)
Okay, mine didn’t come out well, but I know the basics now, so let me try to explain.
The packs you see on the “Instruction page” are about 7cmX20cm.
you measure from the center 3cm to left and right (summed up to 6cm (that is the red lines you can see.
And you also measure 6cm from each edge. So between each measurement line there are a few milimeters of “dead space” necessary so that the paper doesn’t touch each other when wrapping”.
The decoration with the jack o lanterns doesn’t matter at all, these edges technically aren’t used, so you can even put a Baby MOnkey on here!
Now comes the tricky part, that must be really easy if you have the right material.
I didn’t, so Neigel if you can, I would be happy if you could tell me what “paper” would be best to use (I’m in Japan, so japanese name of the material or place to get it is fine!)
Anyway what you need to do is :
have 3 stripes of “paper”, that are up to 77cm long(this lenght consists of
7cm width of the mikl packX 11 (this way you can wrap it 11 times, this is the possible page number of the picture book.
If it’s longer (that’s what I did), the paper ends up in a big mess when wrapping.
Now , if you have these stripes of paper, (6cmwide)
adjust them to the packs as you see in picture 3, then wrap them around each pack
Whe you are finsihed with wrapping put the boxes next to each other as in picture 4, then glue each end to the opposites bos, so that the boxes get connected.
Basically it’s finished now, you still have to glue or draw the pictures you want to present.
The hard thing was to get long stripes of paper, so I measured and cut them up, of course the cutting line wasn’t 100% what makes things really difficult.
But try it, so you have the idea how it works technically and then you can watch out for the perfect boxes and tape or paper, to make work wasy.
I don’t know about Austria but in Germany I can’t think of any drink boxes that have the same size as milk boxes here in Japan.
But it should work with anything that’s square.
You only have to be careful to leave the “dead space” between the paper stripes.
Nigel, if this sounds really bad, I’m sorry. I hope I didn’t make any mistakes.
If I did, don’t hesitate to make corrections.
Hi Nigel,
Thank you very much for sharing your Hmm,,Nigel’s milk cartoon. Hey that was very nice you know, a brilliant idea you came-up to hook- students attention. Timely because I was struggling on how to teach that portion. I’ll ask my superman to make it for me. As of now thank you.
This is so cool! The pictures give me a general idea of how it works but I can’t figure it out well enough from just the pictures… I too would it if someone would be so gracious to translate it in English!!!! Thank you so much for sharing this neat idea!
OK I see that Margit has undertaken the task!! Thanks!! The confusing part is wrapping those paper strips. I’ll just have to give a try and see how it goes. I can use juice boxes here since they don’t sell milk in cartons here.
Great idea. Thanks to Nigel and to Margit!!
Margit
Thank you so much for the translation and posting your own results. Our milk cartons are a little different so I too will use juice cartons.
Nigel, great idea! I took a quick peek and will try it with my daughters. Margit the paper is called 模造紙 mozoushi and it is very commonly used in schools to make posters and reports. It is the large poster type paper with squares and comes in different colors. I will have to read the instructions more carefully, but I don’t think you will have to cut and paste to make one long strip of paper. Ask your school, they usually have boxes of them. Otherwise you can get them in any stationery story or 100 yen shop.
Thank you for the great idea, Nigel!
I’ve just put the translation with pictures on my blog. Sorry, it took me so much time to do it, because I had to drink two cartons of juice!
But it works greatly! I can change phases nine times!
I hope it would put some additional explanation to Margit’s and everyone could understand it.
I forgot to put my blog entry.
http://pub.ne.jp/tatchan/?entry_id=2289819
GUMBY,
MOZOUSHI,is what I used, but it is big, and you need thin stripes (I don’t mean for the underground wrapping of the boxes, but for the “film stripes”/the paper that is pink and blue in the fotos)??!
I went into all kind of stores, but I didn’t find any paper with 6cm width.
Margit,
You might cut Mozoshi into strips of 6cm width. The Japanese instruction says so, and it was easy for me to make the strips because it has thin lines on the paper.
If you have bigger size of cartons, you just make the strips wider. And if you’d like more phases to appear, you might make the strips longer.